Setting up a Mumble server on VPS hosting gives you full control over your voice chat environment. You get low latency, strong encryption, and no arbitrary user limits. This guide walks you through the entire process step by step. We will cover VPS provisioning, Mumble installation on Linux, and essential configuration settings. Even if you are new to server administration, the instructions stay clear and actionable. Your private, self-hosted voice server is closer than you think.

What’s Needed to Get Started
To launch your own Mumble instance, you need a few core components ready before installation begins. A reliable VPS server with Linux installed forms the foundation. You will also need root access, a static IP address, and basic familiarity with terminal commands. Network configuration matters too – open UDP port 64738 for Mumble traffic and ensure your firewall allows inbound connections. A domain name is optional but useful for SSL certificate setup. Encryption keeps your voice channels private. Resource requirements stay modest: 512 MB RAM and a single CPU core handle dozens of concurrent users without strain. You can provision infrastructure from a trusted provider like VPS server to ensure stable uptime and low latency for voice packets.
Key prerequisites at a glance:
- Linux VPS with root SSH access.
- UDP port 64738 open and forwarded.
- Basic command line knowledge.
- Optional: domain name for TLS certificates.
- Minimal resources: 1 vCPU, 512 MB RAM, 10 GB storage.
Get these ready first. The actual setup moves fast once the groundwork is laid.
Running Mumble Server on a VPS: A Step-by-Step Guide
1. Establish Your SSH Connection
Start by opening your terminal and connecting to your VPS with the SSH protocol.
Press Enter, then authenticate with your password. This secure shell session becomes your command center for all subsequent Mumble server configuration tasks.
2. Update System Packages Before Installation
You must refresh your software repositories and install pending security patches before adding new applications. This prevents version conflicts and ensures your Mumble server runs on a stable foundation. Execute the following command in your terminal:
Your system is now current.
Skipping this step often leads to broken dependencies during the main installation phase. A clean, updated OS saves hours of troubleshooting later. Proceed only after the terminal returns to the standard prompt.
3. Install the Mumble Server Package
With your system updated, you can now pull the official Mumble server software directly from your distribution's repository. This single command handles downloading the binary and setting up necessary dependencies automatically. Enter this line into your terminal:
The package manager locates the mumble-server application, verifies its integrity, and installs it alongside required libraries like OpenSSL for encryption. The -y flag skips the manual confirmation prompt to speed up the process.
4. Run the Configuration Wizard
Start the interactive setup tool to define critical server parameters. Enter this command:
When the interactive menu appears on your screen, select “Yes” to let Murmur run automatically when the server boots and choose “Yes” for network priority. This ensures low latency.
Set a strong password for the SuperUser account immediately. Leaving the field blank will not change the existing password. Press Tab to select Ok. Hit Enter.
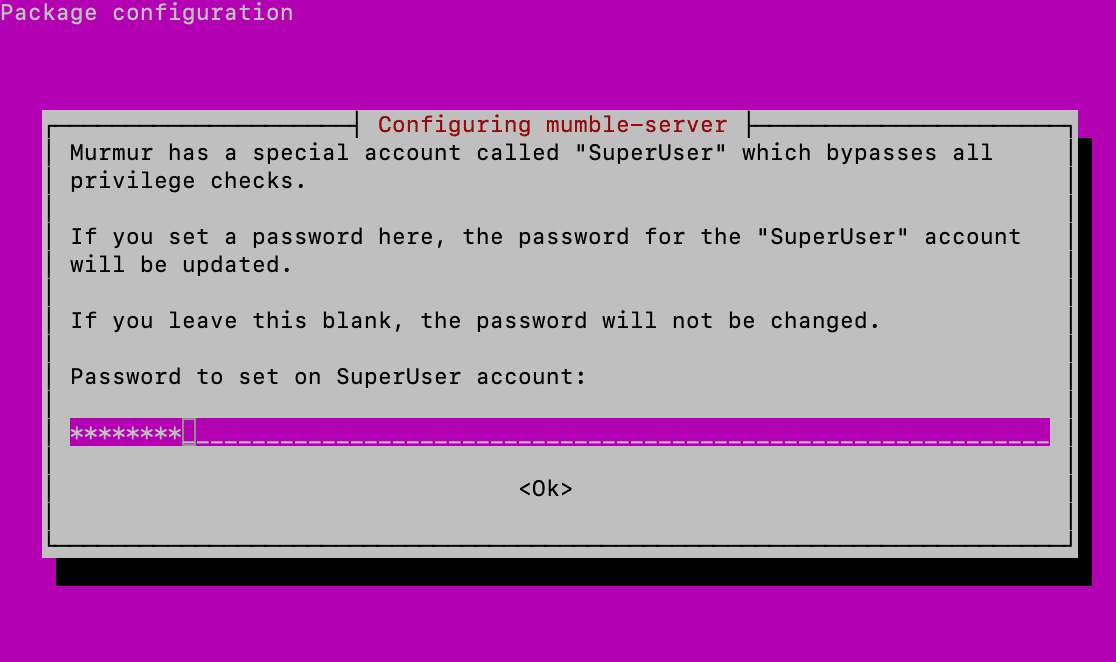
Your server is ready. You now have a working Mumble server with one admin account.
5. Fine-Tune Server Settings in the Config File
The default installation works, but customizing the configuration file unlocks full control over security and performance. Open the main settings file using the nano text editor:
Focus on these critical parameters for a stable, secure server:
- Security: Set autobanAttempts, autobanTimeframe, and autobanTime to block IPs after repeated failed logins. This stops brute force attacks automatically.
- Welcome message: Use welcometext to display rules or links on connect. Wrap the entire value in double quotes, HTML tags included.
- Network: Keep port at 64738 unless you have a specific reason to change it. Leave host blank to listen on all interfaces.
- Performance: Set bandwidth to 60000-72000 for clear voice without memory waste. Limit users to 50 on a 512 MB VPS.
- Chat controls: Enable textmessagelength and imagemessagelength to cap message and image sizes. Turn on allowhtml only for trusted communities.
- Public listing: Fill registerName and registerUrl to appear in the global Mumble directory. Skip these for a private server.
Press Ctrl+X to exit. Hit Y to save. Press Enter to confirm.
Apply your changes with a service restart:
Active connections will drop briefly during restart. Your custom configuration is now live and enforced.
6. Connect to Your New Mumble Server
Download the official Mumble client from the project website to start chatting. Run the setup wizard and launch the application once installation finishes.
Open the client and click Add New in the server list. Enter your VPS IP address in the Address field. Type SuperUser as the username. Input the strong password you created during the dpkg-reconfigure step. Leave the port at 64738 unless you customized it earlier.
Click Connect.
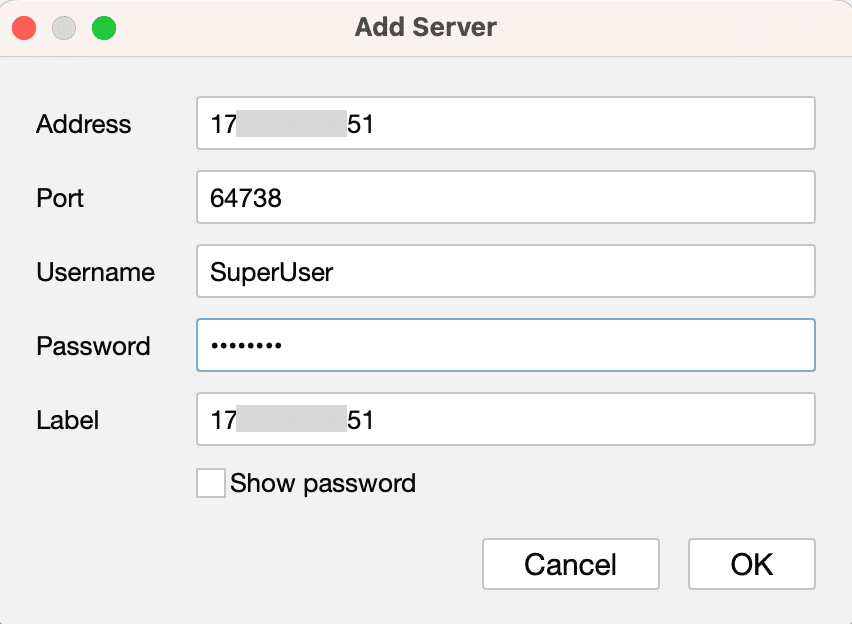
Your client will establish an encrypted voice channel to your private server. You are now logged in as the administrator with full control over channels and user permissions.
Setting up Mumble Server
A working server needs organization to serve your community well. Structure your setup around these core areas.
Channel Architecture
- Create subchannels by right-clicking root > Add for teams, topics, or activities
- Use ACL menus to set passwords or restrict access by user group
- Enable "Temporary Channel" option for auto-deleting rooms that vanish when empty
User Management
- Mumble uses client certificates, not passwords, for authentication.
- Right-click a connected user > Register to lock their identity to your server.
- Pre-reserve names via Server > Registered Users > Add, but note certificates still handle actual login.
Recommended Client Settings
- Audio codec: Opus at 40-64 kbps for clear voice without bandwidth waste.
- Noise suppression: Enable RNNoise for consistent background noise filtering.
- Echo cancellation: Adjust based on hardware; disable if using headphones.
- Jitter buffer: Start at 10 ms, increase only if speech cuts out at start.
Testing and Validation
- Run the loopback test in client settings to verify input and output.
- Use server-mode test to confirm network path and encryption work end-to-end.
Keep defaults where they fit your use case. Over-configuration creates friction for new users. Start simple, then refine permissions and audio settings based on real feedback from your community. Your server is now ready for daily use.
Your Private Voice Network Is Ready
Building a self-hosted Mumble server on a VPS grants you complete ownership over communication data and latency performance. Commercial platforms often compress audio heavily or scan metadata for advertising purposes. Your setup avoids these privacy pitfalls entirely. Maintain security rigorously.
Apply security patches monthly and review your autoban logs for suspicious activity patterns. Stay vigilant. Monitor bandwidth usage as your community expands beyond the initial 50-user limit. You set the server rules. Enjoy interference-free voice chat.