Running a VPS without a firewall leaves your system exposed to scans, bots, and opportunistic attacks from the moment it goes online. Ubuntu 24.04 doesn’t enable a firewall by default, even though one is built right in. That tool is UFW — Uncomplicated Firewall — and it’s exactly what most VPS users need: simple to set up, easy to manage, and effective at blocking unwanted traffic without deep networking knowledge. Whether you’re launching a personal project, a game server, or a production web app, getting UFW configured early helps you control who can reach your system and how. This guide shows you how to install and activate it correctly on Ubuntu 24.04, with the exact commands you need and no guesswork.

How to Set Up a Firewall on Ubuntu VPS (UFW): Step-by-Step Guide 2026
Before you begin, make sure you have SSH access to your Ubuntu VPS. All commands below assume you’re logged in as root or using sudo privileges. If you’re connecting as root, your terminal session should start like this:
Replace ip-server with your actual VPS IP address. Once you’re in, the first thing you should do is ensure your system packages are up to date. This reduces the risk of installing UFW over outdated or potentially vulnerable components.
This command fetches the latest package lists and upgrades installed software in one go. The -y flag automatically confirms prompts, which is handy for scripted or remote setups.
With the system updated, it’s time to install UFW. Despite its capabilities, UFW isn’t installed by default on minimal Ubuntu images — commonly used by VPS providers — but it’s available in the official repositories.
The installation is quick and lightweight. Once it’s done, you can check the current status of the firewall:
At this point, you’ll see output similar to: Status: inactive. This confirms UFW is installed but not yet enforcing any rules. That’s expected — and safe — because enabling it prematurely without allowing SSH could lock you out of your server. The next step is critical: configure essential access rules before turning UFW on. Start by allowing SSH traffic. By default, SSH runs on port 22, and UFW includes a built-in application profile for it.
This command adds a rule that permits inbound connections on port 22/tcp. You could also use ufw allow 22/tcp, but using the service name (ssh) is cleaner and more readable, especially in configuration documentation. If your server hosts a web application or website, you’ll likely need to open HTTP and HTTPS ports. These are standard for web traffic:
Port 80 handles unencrypted web traffic (HTTP), while 443 is used for encrypted connections (HTTPS). Even if you plan to redirect HTTP to HTTPS later, it’s common practice to keep port 80 open for initial handshake or Let’s Encrypt validation. You can also allow other services as needed — like a Minecraft server on port 25565, a database on 3306, or a custom API on another port — but for this baseline setup, SSH, HTTP, and HTTPS are the essentials.
Now that the necessary rules are in place, you can safely activate the firewall:
UFW will warn you that the operation may disrupt existing SSH connections. If you’ve already allowed SSH (as shown above), you’re safe to proceed. Type y and press Enter. Once enabled, check the status again to confirm everything is working:
You should now see output like this:
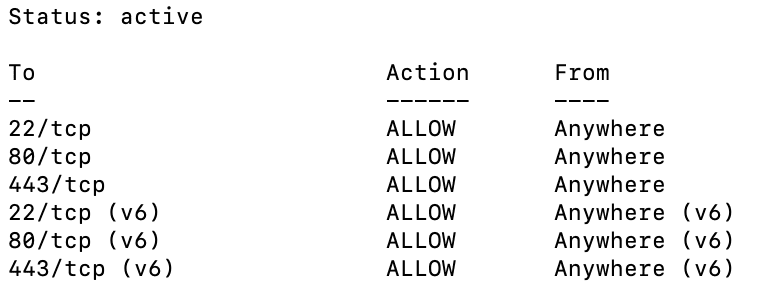
This confirms that UFW is active and enforcing your rules for both IPv4 and IPv6. By default, UFW denies all incoming connections and allows all outgoing traffic — a secure starting point that follows the principle of least privilege.
Conclusion
Installing and configuring UFW on Ubuntu 24.04 is one of the fastest, most effective ways to harden your VPS. With just a handful of commands, you move from an open, vulnerable state to a controlled, secure baseline. The process outlined here — updating the system, installing UFW, allowing essential services, and enabling the firewall — is battle-tested and suitable for everything from personal blogs to small business applications.
UFW’s design philosophy aligns perfectly with modern DevOps practices: minimal, explicit, and reversible. It doesn’t assume, it doesn’t overcomplicate, and it doesn’t get in your way. For Ubuntu users, especially on a VPS from providers like VPS.one, enabling UFW should be as routine as setting a strong root password or configuring automatic updates. Take the extra two minutes during setup. Your future self — and your server’s uptime — will thank you.