Running your own Minecraft server gives you full control over gameplay, mods, and player access. This guide walks you through setting up a Minecraft Java Edition server on Ubuntu 22.04 using a VPS. You’ll install Java, configure the firewall, launch the server, and connect to it securely. Designed for intermediate users, every step is clear, tested, and focused on stability — no third-party tools, no hidden costs, just your server, your rules.

Why You May Want to Use a Virtual Private Server (VPS)
Choosing a Virtual Private Server (VPS) for your Minecraft server strikes the perfect balance between power, control, and cost. VPS gives you dedicated CPU, RAM, and storage. This means consistent performance, even as more players join or mods increase load. If your world grows, scaling up is just a few clicks away. Most providers let you upgrade memory or processing power without migrating data or changing IP addresses.
Root access is another key advantage. With full administrative control, you can install Java versions, configure firewalls, set up automated backups, and run background services like screen or cron jobs — all essential for reliable server operation. You’re not locked into a managed interface that hides system details. You see everything. You control everything. Compared to running a server locally, a VPS runs 24/7 on high-availability infrastructure with enterprise-grade networking and power redundancy. No home internet outages, no electricity drops, no dynamic IPs.
How to Create Minecraft on Ubuntu VPS: A Step-by-Step Guide 2026
Step 1. Choose a VPS Plan
Choose your VPS like you’d choose a foundation for a house — don’t rush it, and don’t settle for something that looks cheap but cracks under pressure. You’re not buying a slot on a shared server. You’re renting a slice of real hardware, and it needs to handle constant player connections, chunk loading, and Java’s memory hunger. At minimum, go with 2GB of RAM. If you plan on more than five players — or even just want smooth performance during peak hours — 4GB is the real starting point. More RAM means fewer lag spikes, fewer crashes, and less stress when your friends show up unexpectedly.
Step 2. Prepare the server
Connect to your VPS using SSH. Open a terminal on your local machine and enter:
Replace your-server-ip with the actual IP address of your server. You will be prompted to enter the root password that you received when you ordered your VPS. After logging in, you will be at the server command line.
Before installing anything, make sure the system is up to date. Run:
This fetches the latest package lists and installs all available security and system updates. It takes a minute. Let it finish. Skipping this step can lead to compatibility issues later — especially when installing Java or configuring the firewall.
You’ll see output showing which packages are being upgraded. If no updates appear, that’s fine. It means your system was already current. Don’t proceed until this step completes successfully. A clean, updated base is the foundation for a stable server. You’re not just running commands. You’re preparing a reliable environment.
Step 3. Install Required Software Packages and Configure the Firewall
Start by installing essential tools: screen for persistent server sessions, nano for file editing, wget to download the server, and git in case you later want to pull plugins or mods.
Next, ensure the firewall is active. Install and configure it now:
Now open port 25565 — the default for Minecraft Java Edition:
Enable the firewall:
You’ll see a message confirming the firewall is active. This setup blocks all unnecessary traffic while keeping SSH and Minecraft accessible. Now install Java. Minecraft 1.20.4+ runs best on OpenJDK 21. Earlier versions may cause startup issues or prevent modern features from working.
Verify the installation:
You should see output confirming OpenJDK 21. If not, stop and recheck the install — running an outdated JVM leads to instability. Create a dedicated directory for your server files:
Then navigate to the created directory:
This keeps everything organized and isolated from system files.
Now go to https://www.minecraft.net/en-us/download/server, find the latest server version, and copy the direct JAR link.
Use wget to download it:
List the contents to confirm the file arrived:
You now have the server binary, a clean environment, and a secure network setup. The foundation is solid. Next step: bring the server to life.
Step 4. Launch the Minecraft Server
Start the server for the first time:
The process will fail — this is expected. It generates critical files like eula.txt and server.properties, then exits.
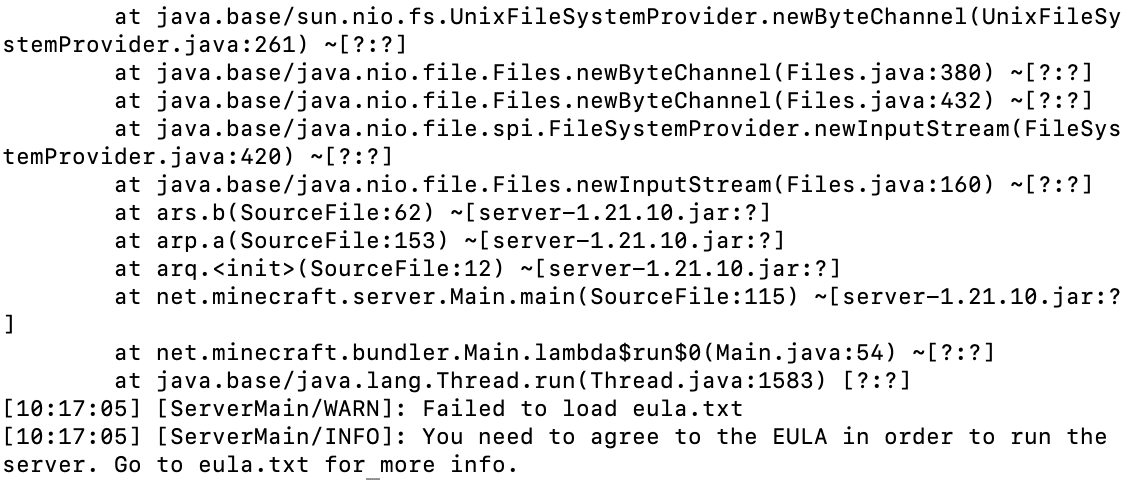
Check what was created:
You’ll see both files now exist. The next step is mandatory: accept the EULA. Open it in nano:
Inside, you’ll find this line: eula=false. Change it to: eula=true. Save and exit: press Ctrl+X, then Y, then Enter. This action confirms you’ve read and agreed to Mojang’s End User License Agreement. Without this, the server won’t start. Restart the server:
This time, it boots fully. You’ll see logs showing world generation, seed selection, and the final “Done” message when ready. While the server runs, type help in the console to see available commands. To shut it down cleanly, use:
Never close the terminal abruptly — always use stop to avoid corruption. Now adjust one key setting: authentication. By default, the server validates player accounts against Mojang’s servers. That’s fine for official accounts — but if you’re testing locally or hosting a private group, you might need offline access. Edit the config:
Find the line: online-mode=true. Change it to: online-mode=false. Save with Ctrl+X, Y, Enter. Restart the server to apply:
You’ve set up Java, configured the firewall, and accepted the EULA. If you start the Minecraft server directly in your SSH session and then close the terminal, the process dies. Enter screen — a lightweight session manager that keeps your server running even when you log out. Start a new named session:
This creates an isolated shell environment called minecraft1. You’re now inside it. Anything you run here stays alive after you detach. To verify active sessions later, use:
You’ll see a list like minecraft1, server-test, or similar — each representing a separate running process. Now, within this session, launch the server:
Let’s break down what each part does:
- -Xmx1024M sets the maximum RAM limit to 1024 MB (1 GB). Increase this (e.g., -Xmx3G) if you have more players or use mods.
- -Xms1024M defines the initial memory allocation. Matching it with -Xmx reduces performance spikes during startup.
- -jar server.jar tells Java which file to execute—the Minecraft server JAR you downloaded.
- nogui disables any graphical interface. There’s no display on a VPS. This flag prevents errors and saves resources.
Once the server starts and shows “Done,” it’s live. Press Ctrl+A, then D to detach from the session. The server keeps running in the background. Need to get back? Reattach anytime:
Or switch between multiple server instances using Ctrl+A, then N for next session. With screen, you can host multiple worlds — creative, survival, test servers — all on one VPS, each in its own managed session.
Step 5. Connect to Your Minecraft Server
Launch the Minecraft client on your local machine. Use the official launcher from minecraft.net minecraft.net. Log in with any valid account.
Click Play, then go to Multiplayer. Click Add Server. In the Server Address field, enter your VPS’s public IP address. Leave the port blank — 25565 is assumed. Click Done, then select the server entry and click Join Server.
If your firewall is correct, Java is running, and the server is active, you’ll connect within seconds. You’ll spawn into a fresh world, ready to build, test, or invite others. No third-party tools. No middlemen. Just your server, your rules, and full control.
Conclusion
This guide walked you through every essential step: selecting a reliable VPS, installing Java 21, configuring the firewall with ufw, accepting Mojang’s EULA legally and correctly, and running the server persistently using screen. You now have a stable foundation on Ubuntu 22.04, proven to support both small private worlds and growing player communities.
Self-hosting isn’t just about saving money — it’s about ownership. No forced updates. No banned plugins. No surprise shutdowns. When something breaks, you fix it. When you want new features, you add them. Keep the system updated, monitor resource usage, and always test changes in a detached screen session. Your Minecraft world is no longer hosted. It’s engineered.